Upgrading an existing app to the latest version of a framework can be a daunting task. That’s why this two-part series was created, to make your migration experience more pleasant.
The Vue 3 Migration series:
- Vue 3 Migration Build (the previous article)
- Vue 3 Migration Changes (this article)
If you’re not familiar with the migration build, please check out the Vue 3 Migration Build article, that’s the prerequisite for this article. If you don’t have an app to migrate, you can still use this article to learn about what has changed in Vue 3. But keep in mind that we are only discussing changes here, we won’t be getting into new features such as the Composition API. (check out Vue Mastery’s Composition API course if you’re interested in that)
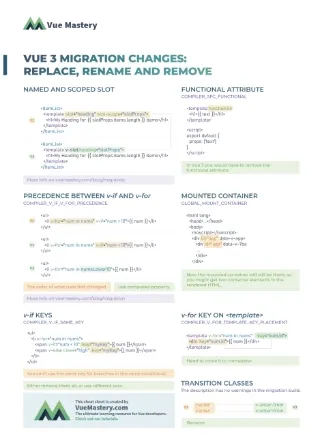
Along with this article, we’ve also created a cheatsheet for the most common changes.
The Workflow
This is the workflow of using the migration build as you might have seen in the previous article:

In that article, we’ve gone through fixing some simple deprecations just to illustrate how to use the migration build. This article is about the deprecations themselves.
Building on the above workflow, the features deprecated in Vue 3 can be divided into four categories: the incompatible, the replaced, the renamed, and the removed.
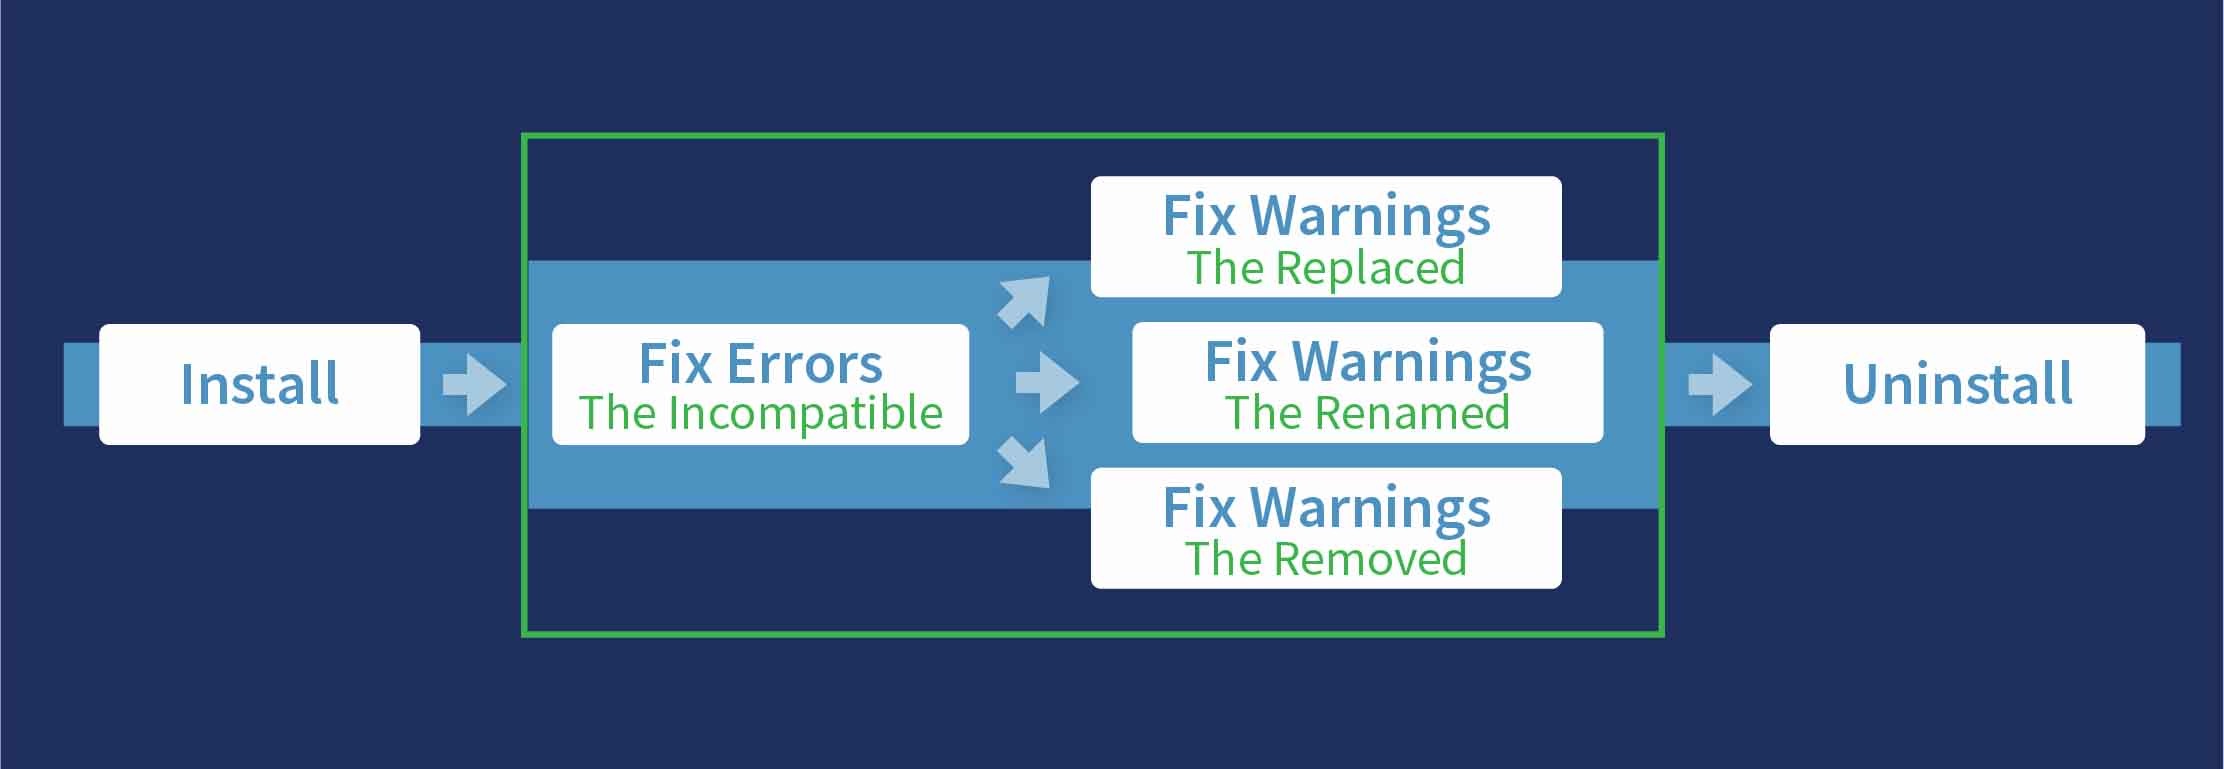
Each category will contain various deprecations and their corresponding migration strategies (things you have to do to make your code work again running on Vue 3).
For ease of reference (and googling), I’ve put the deprecation flag names in their respective sections of the article. These are the flags that show up when you’re running the migration build while having the deprecated code.

Again, if this doesn’t ring a bell, you can refresh your memory with the Vue 3 Migration Build article.
Without further ado, let’s start our journey!
The Incompatible
Deprecations in this category will actually cause your app to not work at all, even running the migration build. So we need to fix them first before anything else.

Named and Scoped Slot (replaced)
Slots and scoped slots are complex topics that we won’t explore in this article. But this guide can help you to refactor your code for Vue 3 if you are already using <slot> in your components.
In Vue 2, you can create a named scoped slot like this:
<ItemList>
  <template slot="heading" slot-scope="slotProps">
    <h1>My Heading for {{ slotProps.items.length }} items</h1>
  </template>
</ItemList>
(This still works in Vue 2.6, but it’s considered deprecated, and this wouldn’t work in Vue 3 anymore.)
In Vue 3, you would have to change it to this:
<ItemList>
  <template v-slot:heading="slotProps">
    <h1>My Heading for {{ slotProps.items.length }} items</h1>
  </template>
</ItemList>
Changes:
- Use of
v-slotinstead of pairing togetherslotandslot-scopeto do the same thing. - If you don’t need
slotProps, you can just have the attributev-slot:headingbe valueless.
INSTANCE_SCOPED_SLOTS
On a related note, if your code is using the $scopedSlots property, that has to be renamed to $slots in Vue 3.
Functional attribute (removed)
COMPILER_SFC_FUNCTIONAL
In Vue 2, you can create a functional component in your Single File Component (SFC) like this:
<template functional>
  <h1>{{ text }}</h1>
</template>

<script>
export default {
  props: ['text']
}
</script>
In Vue 3, you would have to remove the functional attribute:
<template>
  <h1>{{ text }}</h1>
</template>

<script>
export default {
  props: ['text']
}
</script>
So, technically you can’t create functional components in SFC format anymore. But since the performance advantage of functional components is so much smaller in Vue 3, it’s not a huge loss anyway. (We can still create functional components in Vue 3, just not with <template> in a .vue file. More about this in the Functional Component section below)
Mounted Container
GLOBAL_MOUNT_CONTAINER
Vue 3 doesn’t replace the element that your app is mounted to, hence you might see two divs with id="app" in the rendered HTML.

To avoid styling duplications, you would have to remove id="app" from one of the two <div>s.
v-if and v-for
COMPILER_V_IF_V_FOR_PRECEDENCE
If you are using v-if and v-for together on the same element, you would have to refactor your code.
Since the default Vue CLI ESLint setup would actually prevent you from using v-if and v-for together on the same element even in a Vue 2 app, it’s highly unlikely that you actually have this kind of code in your app.
But in the case that you do, here’s what’s changed.
In Vue 2, v-for has precedence over v-if, and in Vue 3, v-if has precedence over v-for.
So with Vue 2 code that looks like this to render only the numbers lower than 10:
<ul>
  <li v-for="num in nums" v-if="num < 10">{{ num }}</li>
</ul>
In Vue 3, you would have to write it like this:
<ul>
  <li v-for="num in numsLower10">{{ num }}</li>
</ul>
numsLower10 has to be a computed property.
v-if branch keys
COMPILER_V_IF_SAME_KEY
If you have the same key for multiple branches of the same v-if conditional:
<ul>
  <li v-for="num in nums">
    <span v-if="num < 10" :key="myKey">{{ num }}</span>
    <span v-else class="high" :key="myKey">{{ num }}</span>
  </li>
</ul>
In Vue 3, you would have to remove them (or assign them different keys):
<ul>
  <li v-for="num in nums">
    <span v-if="num < 10">{{ num }}</span>
    <span v-else class="high">{{ num }}</span>
  </li>
</ul>
Vue will assign unique keys to them automatically.
v
v-for key
COMPILER_V_FOR_TEMPLATE_KEY_PLACEMENT
If you’re using v-for on <template> with :key in the inner element(s):
<template v-for="num in nums">
  <div :key="num.id">{{ num }}</div>
</template>
In Vue 3, you would have to put the :key in the <template>:
<template v-for="num in nums" :key="num.id">
  <div>{{ num }}</div>
</template>
Transition classes (renamed)
If you’re using the <transition> element for animation purposes, you would have to rename the class names v-enter and v-leave:
v-enter⇒v-enter-fromv-leave⇒v-leave-from
(This deprecation is a little special because the migration build will not warn you about it.)
Now we can move on to the other less imminent deprecations. You can work through them in any order.
The Replaced
Deprecated features in this category are removed but replaced with new features as solutions.

App Initialization (replaced)
GLOBAL_MOUNT / GLOBAL_EXTEND / GLOBAL_PROTOTYPE / GLOBAL_OBSERVABLE / GLOBAL_PRIVATE_UTIL
Your Vue 2 main.js file might look something like this:
import Vue from "vue" // import an object
import App from './App.vue'
import router from './router'
import store from './store'

Vue.use(store)
Vue.use(router)

Vue.component('my-heading', {
  props: [ 'text' ],
  template: '<h1>{{ text }}</h1>'
})

// create an instance using the new keyword
const app = new Vue(App)

app.$mount("#app");
In Vue 3, you would have to change it to this:
import { createApp } from 'vue' // import a function
import App from './App.vue'
import router from './router'
import store from './store'

// create an instance using the function
const app = createApp(App)

app.use(store)
app.use(router)

app.component('my-heading', {
  props: [ 'text' ],
  template: '<h1>{{ text }}</h1>'
})

// no dollar sign
app.mount('#app')
Changes:
- There’s no
Vueimport from thevuepackage anymore. We have to use the newcreateAppfunction to create an app instance. - The
mountmethod has no dollar sign. - Instead of using functions such as
Vue.useandVue.component, which would affect Vue behaviors globally, we now have to use the equivalent instance methods, such asapp.useandapp.component.
Here’s a list of changes from the old Global API to the new Instance API:
Vue.component⇒app.componentVue.use⇒app.useVue.config⇒app.configVue.directive⇒app.directiveVue.mixin⇒app.mixinVue.prototype⇒Vue.config.globalPropertiesVue.extend⇒(nothing)Vue.util⇒(nothing)
Vue.extend is removed. Since the app instance is no longer created through the new keyword and the Vue constructor, there’s no such need to create subclass constructor through inheriting the base Vue constructor with the extend function.
Though Vue.util is still there, but it’s private now, so you won’t be able to use it, too.
Vue.config.ignoredElements is replaced with app.config.compilerOptions.isCustomElement that should be set with a function instead of an array. And Vue.config.productionTip is removed.
Functional Component (replaced)
COMPONENT_FUNCTIONAL
Without using <template>, a Vue 2 functional component can be created like this:
export default {
  functional: true,
  props: ['text'],
  render(h, { props }) {
    return h(`h1`, {}, props.text)
  }
}
In Vue 3, you would have to change it to this:
import { h } from 'vue'

const Heading = (props) => {
  return h('h1', {}, props.text)
}

Heading.props = ['text']

export default Heading
Changes:
- Functional component has to be a function, not an option.
- Although not exclusive to the topic of functional component, the
hfunction in Vue 3 has to be imported from thevuepackage instead of coming in as the parameter of the render function.
v-for References (replaced)
V_FOR_REF
If you’re using ref in a v-for element to gather all the HTML element nodes (references) that you can access later through this.$refs.myNodes:
<template>
  <ul>
    <li v-for="item in items" :key="item.id" ref="myNodes">
      ...
    </li>
  </ul>
</template>

// later

...
mounted () {
  console.log(this.$refs.myNodes) // list of HTML element nodes
}
In Vue 3, you would have to use :ref (with a colon) to bind to a callback function:
<template>
  <ul>
    <li v-for="item in items" :key="item.id" :ref="setNode">
      ...
    </li>
  </ul>
</template>

// later

...
data() {
  return {
    myNodes: [] // create an array to hold the nodes
  }
},
beforeUpdate() {
  this.myNodes = [] // reset empty before each update
},
methods: {
  setNode(el) { // this will be called automatically
    this.myNodes.push(el) // add the node
  }
},
updated() {
  console.log(this.myNodes) // finally, a list of HTML node references
},
Here, we’re using a callback function to add each node to an array during the rendering process. At the end, you will have this.myNodes as a replacement for this.$refs.myNodes.
Native event (replaced)
COMPILER_V_ON_NATIVE
To illustrate the problem, let’s say we have a SpecialButton component like this:
<template>
  <div>
    <button>Special Button</button>
  </div>
</template>
When you’re using this component (in a parent component), let’s also assume that you want to add a native click event to the <div> element, you would do this (in Vue 2):
<SpecialButton v-on:click.native="foo" />
In Vue 3, the native modifier is removed, so the above code wouldn’t work.
So how do we add a native click event to the <div> element located in our SpecialButton component?
We would have to remove native, and it will work again:
<SpecialButton v-on:click="foo" />
This deprecation was fixed easily, but there’s a new problem arise from this.
In Vue 3, all events attached to a component will be treated as native events and get added to the root element of that component. That’s the default behavior, and that’s why we no longer need the native modifier.
But what if the event we’re adding isn’t intended as a native event?
For example, we want the SpecialButton to emit a special-event:
<template>
  <div>
    <button v-on:click="$emit('special-click')">Special Button</button>
  </div>
</template>
In the parent component, we have to set up the event like this:
<SpecialButton v-on:click="foo" v-on:special-click="bar" />
Just like the click event, this special-click event by default will get attached to the root element (<div>) of the SpecialButton component, which is not our intention. Though the special-click event will still get emitted, the problem is that that same event also gets attached to the <div> element as a native event.
This doesn’t seem like a big problem now, since the special-click event will never get triggered on the <div> anyway. But it can be a problem if the custom event is named click or any name that also happens to be a native event. In that case, a single click will trigger multiple click events. (one on the <button>, another one mistakenly on the <div>)
The solution to this is the new emits option in Vue 3.
With the emits option, we can make our intention clear so that our custom event will not get mistaken for a native event and added to the root element.
So, if we specify all the custom events (just one in our case) we’re emitting in SpecialButton:
export default {
  name: 'SpecialButton',
  emits: ['special-click'] // ADD
}
Vue will know that this is a custom event and will not attach the special-click event to the root element as a native event.
So if you’re using the .native modifier, you would have to remove it. And to prevent unintended events added to the root element, you would have to use the emits option to document all the custom events the component can emit.
The Renamed
The deprecations in this category are the most trivial of all. All you have to do is to change the old names to the new names.

v-model prop and event (renamed)
COMPONENT_V_MODEL
If you’re using v-model on a component, you would have to rename your prop and event:
value⇒modelValue$emit("input")⇒$emit("update:modelValue")
(Don’t forget to put the event name in the emits option as mentioned previously.)
Lifecycle hooks (renamed)
OPTIONS_BEFORE_DESTROY / OPTIONS_BEFORE_DESTROY
If you’re using the lifecycle hooks beforeDestroy and destroyed, you would have to rename them:
beforeDestroy⇒beforeUnmountdestroyed⇒unmounted
(No changes to other hooks.)
Lifecycle events (renamed)
INSTANCE_EVENT_HOOKS
If you’re listening for a component’s lifecycle events in its parent component:
<template>
  <MyComponent @hook:mounted="foo">
</template>
In Vue 3, you would have to rename the attribute prefix from @hook: to @vnode-:
<template>
  <MyComponent @vnode-mounted="foo">
</template>
As mentioned in the previous section, beforeDestroy and destroyed have been renamed. So if you are using @hook:beforeDestroy and @hook:destroyed, you would have to rename them to @vnode-beforeMount and @vode-unmounted instead.
Custom directive hooks (renamed)
CUSTOM_DIR
If you’ve created your own custom directives, you would have to rename the following hooks in your directive implementations:
bind⇒beforeMountinserted⇒mountedcomponentUpdated⇒updatedunbind⇒unmounted
If you’re using the update hook, that has been removed in Vue 3, so you have to move the code from there to the updated hook.
The Removed
This category is about features that got removed. For some of them, we just have to stop using them in our code, and for others we have to find workarounds.

Reactive property setters (removed)
GLOBAL_SET / GLOBAL_DELETE / INSTANCE_SET / INSTANCE_SET
Vue 3 has been rewritten with a new reactivity system that is built on ES6 technologies, so there’s no need to make individual properties reactive. As a result, Vue 3 no longer offers the following APIs, so you would have to remove them:
Vue.setVue.deletevm.$setvm.$delete
(vm is referring to an instance of Vue)
vm.$children (removed)
INSTANCE_CHILDREN
If you’re using this.$children in your component to access a child component:
<template>
  <AnotherComponent>Hello World</AnotherComponent>
</template>

...
mounted() {
  console.log(this.$children[0])
},
In Vue 3, you would have to use the ref attribute along with the this.$refs property as a workaround.
In a nutshell, if you set ref with a name on a child component:
<template>
  <AnotherComponent ref="hello">Hello World</AnotherComponent>
</template>
You’ll be able to access it using the $refs property in your JavaScript code:
mounted() {
  console.log(this.$refs.hello)
}
vm.$listeners (removed)
INSTANCE_LISTENERS
If you’re using this.$listeners to access the event handlers passed from the parent component:
// Parent component

<MyComponent v-on:click="foo" v-on:mouseenter="bar" />

// Child component

mounted() {
  console.log(this.$listeners)
}
In Vue 3, you would have to access them individually through the $attrs property:
mounted() {
  console.log(this.$attrs.onClick)
  console.log(this.$attrs.onMouseenter)
}
vm.$on, vm.$off, vm.$once (removed)
INSTANCE_EVENT_EMITTER
This might affect you if you are relying on vm.$on, vm.$off, or vm.$once as part of a custom PubSub mechanism. You would have to remove these instance methods and use a different library for that.
Check out a third-party tool called tiny-emitter as a potential solution.
Filters (removed)
FILTERS
If you’re using filters (the pipe syntax) in your template:
<template>
  <p>{{ num | roundDown }}</p>
</template>

...
filters: {
  roundDown(value) {
    return Math.floor(value)
  }
},
In Vue 3, you would have to use plain old computed property instead:
<template>
  <p>{{ numRoundedDown }}</p>
</template>

...
computed: {
  numRoundedDown() {
    return Math.floor(this.num)
  }
},
The rationale for removing filters is that the pipe syntax used like that isn’t the real JavaScript behavior (a pipe is supposed to be a bitwise operator in JavaScript). Most of the things we put between the double-curly brackets are real JavaScript, so it would be misleading when this one thing isn’t.
Another benefit of computed property over filter is that the template code will be cleaner.
is attribute (removed)
COMPILER_IS_ON_ELEMENT
In Vue 2, you can apply the is attribute on a native element (as a placeholder) to render it as a component:
<button is="SpecialButton"></button>
In Vue 3, you would have to replace the native element with <component> to get the same behavior:
<component is="SpecialButton"></component>
If you’re not using the Single File Component format, you can just prefix the value with vue::
<button is="vue:SpecialButton"></button>
Keyboard codes (removed)
V_ON_KEYCODE_MODIFIER
In Vue 2, you can listen for events on particular keys on the keyboard with the corresponding key codes:
<input type="text" v-on:keyup.112="validateText" />
(112 represents the Enter key)
In Vue 3, you would have to use the key name instead:
<input type="text" v-on:keyup.enter="validateText" />
The Miscellaneous
This category has all the deprecations that don’t fit the three main categories (replace, rename, and remove).

v-bind order sensitivity
COMPILER_V_BIND_OBJECT_ORDER
v-bind is now order-sensitive.
If you’re using v-bind="object", while expecting one or multiple other attributes overriding the properties in the object, you have to move the v-bind attribute in front of all the other said attributes.
Let’s say you had this:
<Foo a="1" b="2" v-bind:"{ a: 100, b: 200 }">
The properties in the object will be overridden by the other two attributes because they have the same names a and b.
In Vue 3, you would have to put the v-bind before other attributes to achieve the same “overriding” effect:
<Foo v-bind:"{ a: 100, b: 200 }" a="1" b="2">
v-bind sync modifier
COMPILER_V_BIND_SYNC
If you’re using v-bind with the sync modifier:
<MyComponent v-bind:title.sync="myString" />
In Vue 3, you would have to use v-model instead:
<MyComponent v-model:title="myString" />
v-model has been improved in Vue 3. Now you can provide an argument for v-model like title above, and you can even have multiple v-model.
But your linter might give you an error about this new way of using v-model:

To fix this, you would have to add a rule to your package.json to turn it off:
"parserOptions": {
      "parser": "babel-eslint"
  },
  "rules": {
    "vue/no-v-model-argument": "off" // ADD
  }
(only do this if your linter is giving the error)
Async Component
COMPONENT_ASYNC
An async component looks like this in Vue 2:
const MyComponent = {
  component: () => import('./MyComponent.vue'),
  ...
}
In Vue 3, you would have to change it to this:
import { defineAsyncComponent } from 'vue'

const MyComponent = defineAsyncComponent({
  loader: () => import('./MyComponent.vue'),
  ...
})
Changes:
- The use of the new
defineAsyncComponentfunction. - The
componentoption name is changed toloader.
If your async component is just a function, it has to be wrapped in defineAsyncComponent, too:
// Before
const MyComponent = () => import('./MyComponent.vue')

// After
const MyComponent = defineAsyncComponent(() => import('./MyComponent.vue'))
watch array deep
WATCH_ARRAY
If you’re using the watch option to watch an array, you have to provide the deep option:
watch: {
  items: {
    handler(val, oldVal) {
      console.log(oldVal + ' --> ' + val)
    },
    deep: true // ADD
  }
},
false on attributes
ATTR_FALSE_VALUE / ATTR_ENUMERATED_COERSION
If you’re using false on a non-boolean attribute for removing the attribute:
// template
<img src="..." :alt="false" />

// rendered
<img src="..." />
In Vue 3, you have to use null instead:
// template
<img src="..." :alt="null" />

// rendered
<img src="..." />
Setting it to false in Vue 3 will just render false in the HTML.
If you’re using the so-called “Enumerated attrs” such as draggable and spellcheck, they are also subject to the above rules in Vue 3: false to set false, null to remove.
class and style
INSTANCE_ATTRS_CLASS_STYLE
In Vue 3, class and style are included in $attrs, so you might run into some “glitches” if your code is expecting class and style not being part of $attrs.
In particular, if your code is using inheritAttrs: false on a component, in Vue 2, class and style will still get passed to the root element of that component since they’re not part of $attrs, but in Vue 3, class and style will no longer be passed to the root since they are part of $attrs.
Vuex and Vue Router
If you’re using Vuex and Vue router, you have to upgrade them to Vuex 4 and Vue Router 4 respectively.
"dependencies": {
  "vuex": "^4.0.0",
  "vue-router": "^4.0.0",
  ...
}
Similar to Vue 3, Vuex 4 and Vue Router 4 have changed their Global APIs as well. Now you have to use createStore and createRouter just like you would with createApp:
import { createStore } from 'vuex'
import { createRouter } from 'vue-router'

const store = createStore({
  state: {...},
  mutations: {...},
  actions: {...},
})

const router = createRouter({
  routes: [...]
})
More
There are a few more deprecations that aren’t covered here in this article because they are either too trivial to affect anything or just very uncommon in the first place. But with the app running on the migration build, if you ever run into any warning that hasn’t been mentioned here, you can search the warning flag on google and read the documentation page about it.
As previously mentioned, we’ve also created a cheat sheet for some of the deprecations featured in this article.


